


How To Setup Cloudflare Free SSL On A WordPress Website | Beginner-Friendly Tutorial
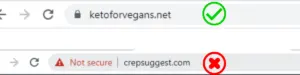
When you browse the internet, you may have noticed that some sites show up as “not secure” in your browser. This is because they do not have an SSL certificate set up which is a little technical certification to show that your site is secure.
Below, you can see a comparison of what a site without SSL encryption looks like vs one that has it set up correctly.
Throughout this article, I’m going to talk you through how to how to setup Cloudflare free SSL on a WordPress website.
This will improve your conversions, as visitors will feel safer when browsing your site. Additionally, it’s also a (very) minor ranking factor for Google and other search engines, so it can also improve your SEO.
How To Setup Cloudflare Free SSL On A WordPress Website: Step-By-Step
While there are many ways to set up SSL encryption, the easiest way I know of is to use Cloudflare which also has many other purposes. This method is extremely beginner-friendly and is also free.
Below, I’ve explained all the steps you need to take to set it up.
Step 1: Sign Up For a Free Cloudflare Account
Before you can set up the SSL certificate for your website, you are going to need a Cloudflare account.
So, just head over to cloudflare.com and sign up for a free account.
Step 2: Get Your Website URL & Basic Set-Up
After you have signed up for a free Cloudflare account, it should bring you to a screen that asks you for your website. It should look like the image below.
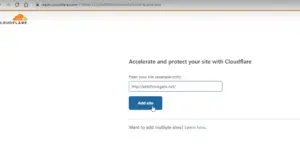
Here you’ll just want to enter your website URL and click “Add site”.
Upon doing so, it will redirect you to a pricing table to select a plan, but if you check below the table there is a free plan that you can choose. The free plan is all you need for our purposes.
After selecting the free plan, it will bring you to the DNS record settings. For now, you can leave this the same, as you shouldn’t have to change any of it. Then, just click next and move onto the next step.
Step 3: Change Your Name Servers
Step 3 is changing the Name Servers which is one of the most important steps.
The name servers are part of your domain and are there to tell the rest of the internet who your website is. What we need to do, is change them to CloudFlare’s Name Servers.
3.1 Head Over To Your Domain Registrar
To change them, you usually need to go to where you purchased the domain, i.e the domain registrar.
This may be NameCheap, BlueHost, Godaddy, or whatever registrar you have chosen.
So, head over to your domain registrar and find the domain that you want to secure.
3.2 Manage The Domain/Open The Settings
In most registrars, it will say something like “manage”, so go ahead and click that.

This should open the settings for that domain. Under the domain settings, you should be able to see a setting called “Name servers”.
You may need to look around here to find the setting, but it shouldn’t be too hard to find.
3.3 Changing The Name Servers
Here, you’ll want to change the setting from whatever it’s on (usually, their standard DNS) to custom DNS.

Then you’ll simply want to replace the name servers with the ones from Cloudflare.
So, take Name Server 1 from Cloudflare and copy and paste it into the Name Server 1 field. Then do the same for the second one as well.
Now just click done.
Usually, it won’t see the change right away. It says it can take up to 48 hours, but that’s rarely the case. More often than not, it’s a few hours or even minutes.
Just click the done button, and it should move you onto the next step which is the quick start guide.
Caution: This will usually take your website down for a very small period of time.
Step 4: Quick Start Guide
Now that you have connected Cloudflare to your website we just need to complete the quick start guide, and then we’ve completed all the steps.
The quick start guide should open with 3 sections names improve security, optimize performance, and summary.
These things can get very technical too, but to help you with it, I’ll just let you know the settings I choose below.
- Automatic HTTPS Rewrites (Redirecting Http version to Https) = On
- Always Use HTTPS? = On
- Auto Minify = I leave this off, but you can turn this on. There are also lots of plugins for this.
- Brotli = I’m not sure what this is, so I just leave it off.
Once you have completed this page, just click “finish”.
Then you’ll be redirected to the screen with the name servers which probably hasn’t taken effect yet. It will probably take a while, but you can take a look at how to check when it’s ready below.
How To Check When It’s Ready
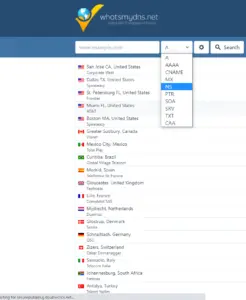
One of the easiest ways to check when it’s ready is to head over to whatsmydns.net.
Click on the A and select “NS” for Name Servers. Then enter your URL, and hit search.
If it says the Cloudflare Name Servers are active, you’ll know the changes have taken into effect.
In my case, it worked quickly and made it to most of the internet within minutes. However, quite often, your browser will still show “not secured” for a short period of time afterward. This is nothing to worry about, it’s usually just because of the domain caching settings.
From this point, you usually just have to wait and it will eventually work. If whatsmydns.net is showing that it’s ready, you can also clear your browser’s cache or go on a new device to see that it’s ready.
That’s It!
I hope you have enjoyed this quick tutorial. If you don’t want to miss out on more tutorials like this one, make sure to subscribe to my newsletter here.
If you have any questions, you can also ask in the Superstar SEO Facebook group here.
You May Also Like: